4 Fall Crafts You Can Make Using Leaves

  1. Share
0 0

Whether it's listening to the leaves crunching under our shoes on a hike, jumping into leaf piles, or smelling the fresh crisp air as we admire the beautiful hues of the harvest season, the sensory experience fall invokes within us all is sure to make a lasting impression on our family as we head outdoors. We can take those memories a step further by creating leaf crafts that we can admire each season.

We’ve thought of four simple low prep and low cost crafts to spend time doing with your kiddos this season. Head out to your own backyard to explore and gather different leaves to make these fun leaf crafts! Looking to make these crafts a little more Leave No Trace friendly? Pick up some fake leaves at your local craft shop! Your kiddos can pick their favorite colors and their finished products will last for years to come!
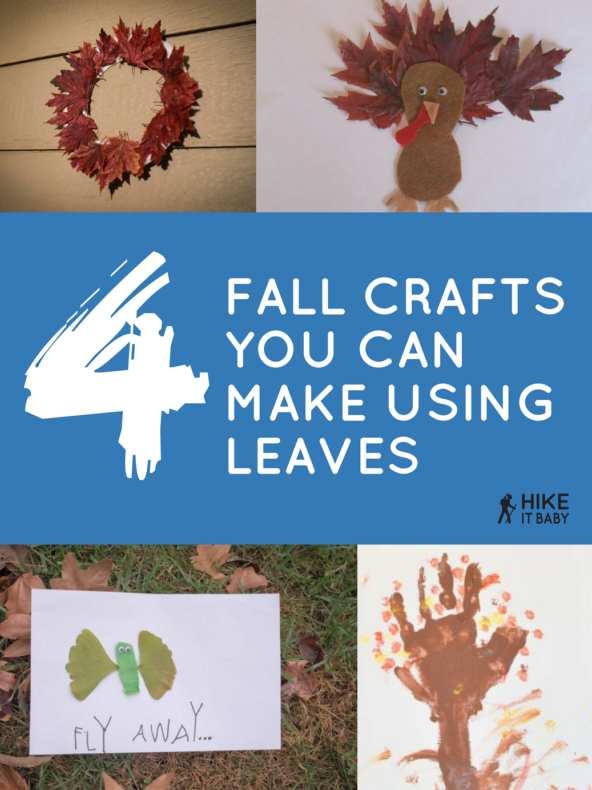
Door wreath

Materials: Paper plate, glue, leaves, optional: ribbon to hang wreath

Instructions: Cut the center out of the paper plate and glue leaves all around the front of the wreath. Use similar colored leaves or mix them up for an even more colorful wreath.
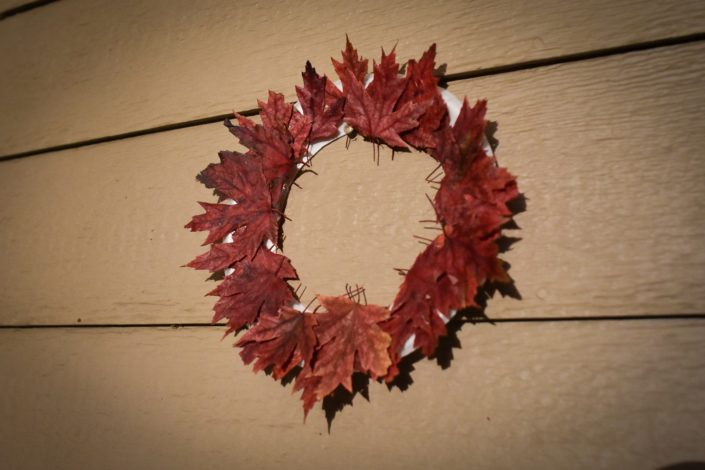
 4 crafts with leaves by Vong Hamilton for Hike it Baby

Butterfly

Materials: Cardstock, green felt, googly eyes, glue, leaves

Instructions: Glue two same-sized leaves on a sheet of cardstock, stems facing inward. Cut a long oval out of green felt and glue over the stems. Glue on googly eyes and watch your butterfly come to life!
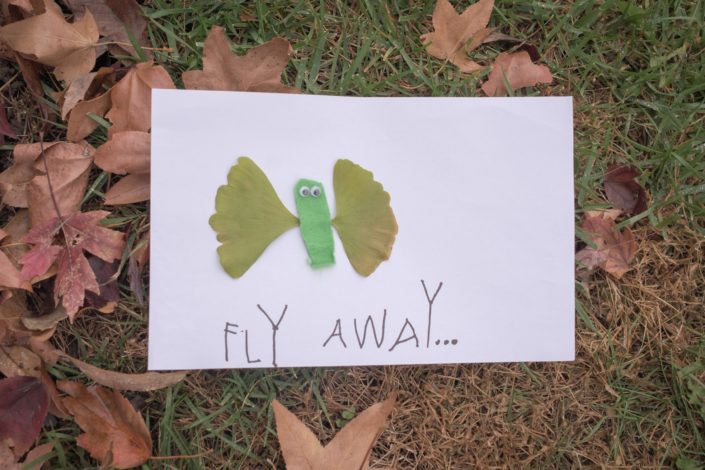
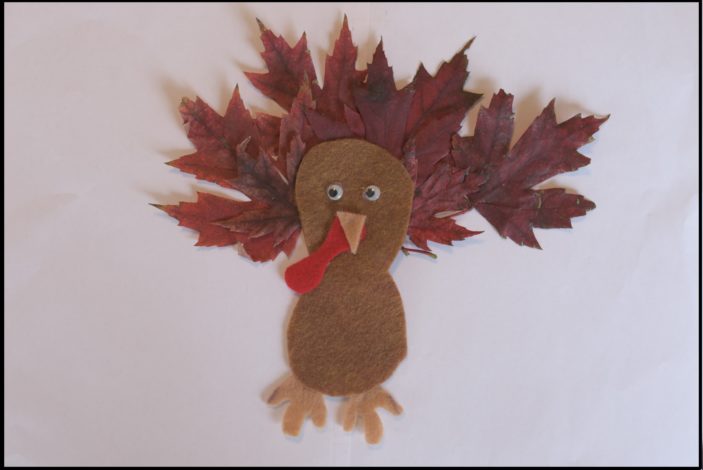
 4 crafts with leaves by Vong Hamilton for Hike it Baby

Turkey

Materials: Cardstock or construction paper, felt or construction paper in dark brown, light brown, and red, googly eyes, leaves, glue

Instructions: Spread glue on cardstock and have child place leaves in a fan shape on the glue. Cut a peanut shape using the dark brown for the body and glue it down over the leaves. Glue on the googly eyes, cut out the waddle with red, and beak and feet and glue down.
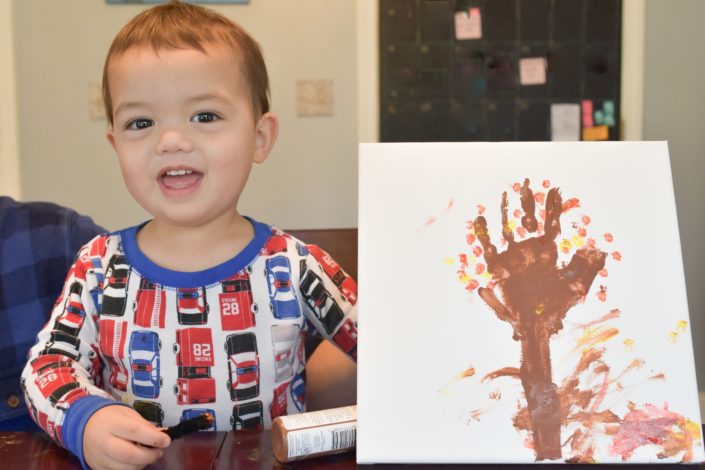
4 crafts with leaves by Vong Hamilton for Hike it Baby

Canvas tree art

Materials: Canvas or cardstock, craft paints in red, brown, orange, and yellow; paint brush/ear swab/folded pipe cleaner (anything that can be used for paint dabbing);  leaves (optional); glue stick (optional)

Instructions: Spread the brown paint on your childs hand, and then stamp it on the cardstock or canvas and then paint on a trunk for the tree. Using the red, orange, and yellow paints dab in leaves around fingers and background. Cut or rip the leaves into smaller pieces, then using a glue stick, select an area near the trunk of the painted tree to apply glue and spread the cut of pieces of leaves at the bottom to create the look of fallen leaves. 4 crafts with leaves by Vong Hamilton for Hike it Baby

4 crafts with leaves by Vong Hamilton for Hike it Baby

4 Fun Fall Craft Ideas Made From Leaves

What are your favorite fall crafts? Leave a comment below!  

Read more:

Photos by Vong Hamilton. 


ABOUT OUTGROWN

OutGrown is a 501(c)(3) nonprofit that works to create a world where everyone can enjoy the physical and mental benefits of spending time outside. We are focused on creating opportunities and removing barriers to access so families with babies and young children can take their first steps outside. We believe all families have the right to connect with nature, benefit from spending time outdoors and be inspired to a lifelong love of nature. Since its grassroots inception in 2013, OutGrown is a growing community of 280,000 families and over 300 volunteer Branch Ambassadors. More information on all of our programs can be found at WeAreOutGrown.org 


EDITORS NOTE:

We hope you enjoyed reading this article from OutGrown. We’re working hard to provide our community with content and resources that inform, inspire, and entertain you.

But content is not free. It’s built on the hard work and dedication of writers, editors, and volunteers. We make an investment in developing premium content to make it easier for families with young children to connect with nature and each other. We do not ask this lightly, but if you can, please make a contribution and help us extend our reach.

Community tags

This content has 0 tags that match your profile.

Comments

To view comments or leave a comment, login or sign up.

Related Content

0
4 Easy Winter Crafts for Kids
Winter's cold temps tend to keep people indoors for the warmth of the fireplace, but despite that, this time of year also brings out people’s creative juices. Everyone becomes a baker, inspired by visions of tasty cookies and the fantastic smells coming from the kitchen. And crafts bring a hint of nostalgia as parents watch their kids create masterpieces that will be hung in the home, taped to the door or dangled from windows and be cherished for years to come. These craft ideas are fun to make and will keep your little one busy this winter. Let’s craft! STICK SNOWFLAKE Materials: Sticks and Twine Gather sticks of the same size and spread them out, keeping them together in the middle. Tie twine around and through the sticks, making sure the snowflake keeps its shape. This craft is super easy and can be made in all sizes. For smaller sizes, instead of sticks, use twigs.   SNOWY PINE CONE Materials: Pine cone, White acrylic paint, Paintbrush, Epsom salts, Twine, Hot glue, Wooden bead Apply white paint to the top of each scale of the pine cone. While paint is still wet, grab a handful of Epsom salts and sprinkle over the pine cone. The salt will stick to the paint, giving your pine cone a frosted look. Let dry. Glue a wooden bead sideways onto the top and loop twine through and tie a knot.   TWIG CAMPFIRE Materials: Handful of twigs, Coaster or another sturdy base, Battery-operated votive, Craft glue Glue along the length of your first twig and press onto your base. Add another layer, applying glue so it affixes to the bottom layer, forming a rough circle. Continue to glue and build your layers of twigs until the structure is about 2 inches high. Turn on your votive and drop it into your campfire.   REINDEER Materials: Twigs, Red felt, Googly eyes, Yarn, Hot glue Cut the twigs so they're the same size. Lay them in a triangle, placing the long ends over the short end, and glue the ends together. With the felt, cut a small circle for the nose and glue it to the bottom of the triangle. Glue googly eyes on to finish the look. Finally, attach both ends of the yarn at the ears. Read more: 4 Fall Crafts You Can Make Using Leaves 10 Easy Outdoors Activities for Toddlers Written by Vong Hamilton and Kristin Hinnant. Photos by Deanna Curry, Kendra Reeder and Kristin Hinnant. What are your favorite winter crafts? Leave a comment below!    ABOUT OUTGROWN OutGrown is a 501(c)(3) nonprofit that works to create a world where everyone can enjoy the physical and mental benefits of spending time outside. We are focused on creating opportunities and removing barriers to access so families with babies and young children can take their first steps outside. We believe all families have the right to connect with nature, benefit from spending time outdoors and be inspired to a lifelong love of nature. Since its grassroots inception in 2013, OutGrown is a growing community of 280,000 families and over 300 volunteer Branch Ambassadors. More information on all of our programs can be found at WeAreOutGrown.org    EDITORS NOTE: We hope you enjoyed reading this article from OutGrown. We’re working hard to provide our community with content and resources that inform, inspire, and entertain you. But content is not free. It’s built on the hard work and dedication of writers, editors, and volunteers. We make an investment in developing premium content to make it easier for families with young children to connect with nature and each other. We do not ask this lightly, but if you can, please make a contribution and help us extend our reach.  
0
How to hike while breastfeeding on trail
In August 1990, a declaration was signed to promote World Breastfeeding Week (Aug. 1-7) to encourage moms to breastfeed and improve their and their baby’s health and well-being. With all the benefits that come with breastfeeding, the decision to nurse also brings many challenges – including the many obstacles that come with nursing on trail. But don’t let that keep you from hitting the trails with baby. To help you overcome some of the fears you might have about breastfeeding on trail, we’ve gathered some firsthand tips from our Hike it Baby families to help you breastfeed on the go trailside. Practice makes perfect It takes some practice playing with your SSC carrier to drop baby down lower so they can latch and you are still comfortable. I keep the waist the same and loosen straps and just keep adjusting baby so that he can latch. Nursing camis work best because you have one shirt under your SSC hip belt. Try to make sure the shirt over your cami is not under the belt. It’s not the end of the world but it takes a little longer having to pull it out to get it up. I often pause until I get him lactched and then I can keep going. It’s easier to readjust after they unlatch while on the go. Practice before you go out on the trail (or store). It helps with your confidence when they are hangry. – Keira, Lexington Branch In a front carry SSC, wearing layers and practicing loosening the shoulder straps to lower the baby is key! Nursing tanks with a shirt over makes it easy to lift the top shirt and still have a covering on your stomach. It also prevents baby from sticking to you (I have sweaty kids) while hiking. With a little practice, I was able to very discreetly feed my son on the trail or out in public and keep going. – Suzanna, Akron Branch Use gear that works for you I really love hiking with a short woven wrap because it makes it really easy to move baby from back to front or hip to nurse and keep on moving. For toddlers who want to walk on their own feet but may still want to nurse, a ring sling is awesome. They pack down small and it's super fast to get kid up and then back down when they're ready. – Courtney, Charleston/Lowcountry Branch For me, layers are great. My favorite combo on the trail is a synthetic nursing tank top with a zip jacket or button-down shirt. Not having to pull my clothes up or down in weird ways allows me to get baby to latch quickly and usually I don't have to stop and remove my pack, etc. – Sarah, Albuquerque Branch Learning to nurse in a carrier was one of the most freeing skills I ever acquired as a parent. I could simply loosen the straps on my SSC carrier to give my baby access and she would contentedly nurse as I walked along. In fact, she got so used to nursing in the carrier that she would grab for the carrier, even when home to tell me she wanted to nurse! The carrier hood also served as a good cover for those times I wanted to be more discreet. It worked so well that I once had a Monk (we were visiting a monastery) come up and pat my daughter on the head when she was nursing, thinking she was simply snuggling! – Rachel, Charleston/Low Country Branch I loved how so often you couldn’t even tell I was nursing, like in this photo. – Rachel Minimize breastfeeding stress on trail If you’re nervous or shy about nursing in public or on the trail, find another mama to nurse with! It's a huge confidence booster when there are 2+ of you sitting together feeding your babies. It definitely helped me the first couple times nursing in public without a cover. – Sandy, South King County Branch My advice is to make it awesome. Find the best possible spot with the best possible view and own it. Make it something to look forward to. – Kathryn I personally don't like nursing in a carrier while walking/hiking because my kids would gag or choke if I was moving. I LOVE the "no hiker left behind" mantra of HiB because I never feel awkward asking to take a nursing break. Luckily, both my kids are fast eaters, so it's never a long stop. My advice: if you're not comfortable hiking while nursing, don't feel bad about asking to stop! – Colleen   What are some ways you’ve successfully nursed on trail that weren’t mentioned here? We’d love to hear your tips in the comments below. Read more: Ways to get back on the trail after having a baby Babies on trail: 4 ways to feed your baby on a hike 9 Tips for soothing a cranky baby on the trail How to prevent clogged ducts on trail Photos by Jessica Human and Andrea Leoncavallo, as well as courtesy of Kiera Wickliffe and Rachel Adams.    ABOUT OUTGROWN OutGrown is a 501(c)(3) nonprofit that works to create a world where everyone can enjoy the physical and mental benefits of spending time outside. We are focused on creating opportunities and removing barriers to access so families with babies and young children can take their first steps outside. We believe all families have the right to connect with nature, benefit from spending time outdoors and be inspired to a lifelong love of nature. Since its grassroots inception in 2013, OutGrown is a growing community of 280,000 families and over 300 volunteer Branch Ambassadors. More information on all of our programs can be found at WeAreOutGrown.org    EDITORS NOTE: We hope you enjoyed reading this article from OutGrown. We’re working hard to provide our community with content and resources that inform, inspire, and entertain you. But content is not free. It’s built on the hard work and dedication of writers, editors, and volunteers. We make an investment in developing premium content to make it easier for families with young children to connect with nature and each other. We do not ask this lightly, but if you can, please make a contribution and help us extend our reach.