Rockin’ the Nature Craft: Behold the Painted Rock

  1. Share
0 0
Have you ever wondered what to do with all of the stones and rocks your toddler piles into his or her pockets? Maybe you have amassed a large collection like I have. And if you are like me, you oblige the rock collecting to an extent and dutifully add them to the “collection”. Our rock collection is kept in an old ball jar. While you may lament this rock obsession toddler phase, don’t be fooled by the simplicity of the rock. It makes a wonderful addition to nature crafts. Not to mention, they are plentiful and free. [gallery link="file" size="full" ids="204026,204027,204028"]

For our nature craft, we chose the larger rocks in our collection and turned them into painted paperweights. These make great gifts for grandparents, mother’s/father’s day, book ends, or just decorative fun art for your fireplace mantel, office, or garden.

Painting rocks is also a hands on learning experience. We talked about which rock was the biggest, middle, and smallest in size. By chance, all of the rocks we used had different shapes; round, egg shaped, and triangle. This gave us the chance to discuss shapes and texture of the rocks. And most appropriately, we had a ton of fun with colors and mixing the paints to create new vibrant colors.

Apart from the learning aspect, this craft was an amazing way to encourage discovery and creativity. We discovered that mixing all the colors together makes ...well...brown. Not very exciting. However, creativity is in the hand of the artist. Each of us created a unique design and ended up marveling over each other’s handiwork.

Here’s what you need to get started creating your own painted rock nature craft.
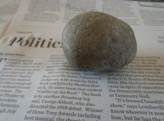
 
  • rock4Rock(s)
  • Newspaper
  • Art smock
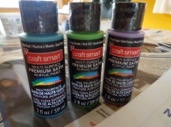
  • Paint (crayola finger paint would work, however I purchased some paint at the craft store for $.99 per bottle). You could also use markers or sharpies to color and decorate with.

How to create your rock-work.

  1. rock5Paint brush or sponge
  2. Felt to place on the bottom (optional)
  3. Googly eye stickers, glitter or other fun add-ons (optional)
  4. Have FUN!

Take time on your next hike to indulge the ever curious little ones and help them scout some great rocks to paint. You just might find the perfect stone.

Erin Vitali is a Branch Ambassador for Capital Region, NY. She lives in Albany with her husband (Mike) and daughter (Juliet). Joining Hike it Baby in October 2015 re-sparked her love of nature and has given her the courage to get out and explore all the beauty her region has to offer. You can also find her writing about her DIY adventures and motherhood at mrsmotherdirt.com.


Community tags

This content has 0 tags that match your profile.

Young Explorers (Walker +)

Comments

To view comments or leave a comment, login or sign up.

Related Content

0
Hiking-inspired Valentine's Day Craft
In this day and age of over-processed everything, I struggle to find Valentine options that don't create sugar-rushed kids, trash or junk toys that just get thrown away. So I went in search of Valentine's Day craft ideas for some hiking-inspired options and found a creative idea from Wilder Child that is great if your child collects treasures from your backyard - of if you have feathers, rocks, nuts or shells around your home. I took it a step further and wanted Valentines we could take hiking but that you wouldn't have to carry out (except the peels). I found a great pen that writes on pears and bananas. However, if you write on a pear, you have to make sure your markers are safe to ingest or buy edible ink markers. I'm not about tracking down a whole set of markers that I'll use once. I have tiny living goals and am training my brain to purchase strategically for that goal. One-use items don't usually count, which means I'm sticking to fruit with peels. Bananas are great but tend to get extra smooshed in our hiking packs ... so oranges it was! How to Make Cutie Valentine's Day "Cards" I first tried using a pen, but I didn't like the skinny lines, so I adjusted. With my sharpie all set, I went to work. I looked up conversation hearts to pull a few sayings and got to writing. Until I had a bag full of Valentine Wishes to hand out. If you're more artistically inclined than I am, you could even use colors and add hearts and emoji faces to your collection of oranges. I did the whole bag in about 10 minutes. Success? I'd say so. Now we're ready to head out on a Valentine's Day hiking adventure with a special surprise treat to share. Happy hiking and Happy Valentine's Day! Read More: 4 Easy Winter Crafts for Kids 3 Easy bird feeders to make this winter What are you planning for Valentine's Day? Let us know in the comments below. We love hearing from you.
0
How To Make Your Own Pinhole Viewer for the Eclipse
Are you ready? The United States is about to witness an amazing spectacle it hasn’t seen in over 45 years.  On Monday, August 21, 2017 a total solar eclipse will travel the expanse of North America, making its way from Salem, Oregon to Charleston, SC.  Witnessing an event like this is quite possibly a once in a lifetime experience for most people and if you live in the United States, chances are good that you’ll get to see it. To see how close you are to the path of totality (where a total solar eclipse can be seen), be sure to visit Nasa’s website.  Even if you can’t make it close to the direct path, you should be able to see a partial eclipse from almost anywhere in the United States.  Keeping your eyes protected when looking at the sun, however, is very important.  Never look directly into the sun!  Many people have opted to order special eclipse viewing glasses, but there is another option for viewing the eclipse that you can make yourself at home.  A pinhole viewer allows you to project the image of the sun onto a screen, protecting your eyes from the sun’s harmful rays.  This step-by-step guide will show you how you can make one yourself with supplies you may already have at home.   Make a Pinhole Viewer Supplies Heavy Cardstock (Black is preferable) Toilet Paper Tube Black Paint and Paintbrush White Parchment Paper X-acto Knife or Sharp Cutting tool (Pocketknife, anyone?) Needle or Push Pin Black Electrical Tape Pinhole Viewer Template PDF Step-by-Step Guide Paint the inside and outside of your Toilet Paper tube black and let dry. Alternately, some craft stores have extra thick cardboard tubes in fun colors that will block the light coming through.  No need to paint. Print out the Pinhole Viewer Template PDF onto your cardstock. If using black cardstock, you will want to choose a light-colored ink to make your print. Cut out the box template from your cardstock. Using an X-acto knife or other sharp cutting tool, carefully cut two slits in the cardstock cut-out where indicated. Using your needle or push pin, very carefully make a hole in the center of the X on your cardstock cut-out. This will be the lens for your pinhole viewer.  You want the hole to be as clean as possible and not too large.  For a cleaner hole, slowly twist the needle back and forth as you push it through. Fold along the dotted lines in order to make a box. Leave the top section open in order to secure the parchment paper. Carefully slide the parchment paper through the slits you created. It should stick out some on either side.  Close up the box once the parchment paper is in place and carefully pull the parchment paper tight.  You don’t want to pull too hard or it will break. Tape the box shut along the seams. You will want to tape everywhere there is a potential light leak, so along the sides of the front lens and all along the top seam. Tape the parchment paper to the side of the box on both sides so that it stretches flat inside the box. After the paper is secure tape around the slits enough times in order to ensure that no light can leak through.  When you are done, you should not see any of the parchment paper.  If you used white or light-colored cardstock you may want to tape around the entire box so that no white cardstock is showing.  This will also help make it more durable for little hands to use. Taking your index finger and thumb pinch four corners into the top of the toilet paper tube in order to form a square. This will allow us to put a circular tube into a square tube. Insert the toilet paper tube into the end of your box and tape all along the seam. Be generous with the tape here.  We don’t want any light leaks. Decorate your viewer how you like! Stickers are always a favorite for little hands. Now that you’ve built your viewer its time to test it! You will need to be in bright sunlight in order for it to work.  Using your hands to shield any light that might come through, bring the viewer up to your eyes and look out at the brightest object you can find.  The sun often works well for this.  As your eyes adjust to the darkness inside the tube you will start to see an image projected on the parchment paper in front of you.  You many notice that it is upside down!  This has to do with the way the optics of the pinhole lens work.  As the light-waves travel through the pinhole they are inverted and projected upside down at the other end.  When viewing the eclipse, however, this shouldn’t be very noticeable. A Couple Safety Precautions for Viewing the Eclipse Cover the other eye!  Since the pinhole viewer is for one eye be sure you have a hand up covering the other eye as you look towards the sun.  Another option is to wear an eye patch over the eye that’s not in use.  Pirate costume optional!  Never look directly at the sun without looking through the viewer.  Younger children may have difficulty keeping the viewer up to their eyes for the whole time they are looking at the sun.  Be sure to practice before-hand and decide whether or not your child can safely use the viewer to view the eclipse. You can use a pinhole viewer to watch other stellar phenomenon, like the transit of Venus Your Pinhole Viewer Can See Things Besides the Sun On very bright days you will be able to see all kinds of things through your pinhole viewers.  Trees, buildings, cars passing down the street, birds flying in the air.  All will become visible on a bright day once your eyes adjust to the darkness inside the tube.  Be sure to have patience while your eyes adjust.  The view will be worth the wait! Photos courtesy of Melissa Hollingsworth and Elliot Cook